Typing is an activity that takes up an ever increasing amount of time in our lives. According to several surveys, for workers in tech, typing takes up an average of 82% of your working hours 1 – a figure that is positively correlated with salary. It is therefore self evident that improving our typing speed, at least to the point where it matches the speed of coherent thought, is a great way to become more efficient, save time, and gain an edge in your work life. This is even without taking into account the time spent typing in one's free time as well.
Going from the average 55.5 Words Per Minute (WPM) for a tech worker to a respectable 80 WPMs, a very feasible 44% improvement in typing speed, will save the average tech worker 3h 40m every day. This is a meaningful saving in life's most precious resource, time. Being the optimizer that I am, I couldn't overlook this.
Moreover, there are serious health benefits to learning to type properly, in terms of reduced risk of carpal tunnel syndrome or repetitive strain injuries: it is no secret that the keyboards that we use in our daily lives, with their staggered QWERTY layout (which was developed to minimize jamming in typewriters), are neither the most ergonomic, nor the most efficient.
Of course, the best way to improve your typing id through training and practice – tools like Monkeytype and Keybr are amazing for learning to touch-type and improving typing speed. That said, there are very effective ways we can get an advantage with better hardware tools.
┌───┬───┬───┬───┬───┬───┬───┬───┬───┬───┬───┬───┬───┬────┐
│ ` │ 1 │ 2 │ 3 │ 4 │ 5 │ 6 │ 7 │ 8 │ 9 │ 0 │ - │ = │Bspc│
├───┴┬──┴┬──┴┬──┴┬──┴┬──┴┬──┴┬──┴┬──┴┬──┴┬──┴┬──┴┬──┴┬───┤
│ Tab│ Q │ W │ E │ R │ T │ Y │ U │ I │ O │ P │ [ │ ] │ \ │
├────┴─┬─┴─┬─┴─┬─┴─┬─┴─┬─┴─┬─┴─┬─┴─┬─┴─┬─┴─┬─┴─┬─┴─┬─┴───┤
│ Caps │ A │ S │ D │ F │ G │ H │ J │ K │ L │ ; │ ' │ Ent │
├──────┴──┬┴──┬┴──┬┴──┬┴──┬┴──┬┴──┬┴──┬┴──┬┴──┬┴──┬┴─────┤
│ Shft    │ Z │ X │ C │ V │ B │ N │ M │ , │ . │ / │ Shft │
├───┬───┬─┴─┬─┴───┴───┴───┴───┴───┴┬──┴┬──┴┬──┴───┴──────┘
│Ctl│Alt│Cmd│         Space        │Cmd│Alt│
└───┴───┴───┴──────────────────────┴───┴───┘
Ortholinear keyboard layouts
The first step away from the standard staggered QWERTY layout is to utilize a so called "ortholinear" layout, which puts all keys in a vertical grid (see below representation), and ensures straight movement for every finger while typing.
┌───┬───┬───┬───┬───┬───┬───┬───┬───┬───┬───┬───┐
│ Q │ W │ E │ R │ T │ Y │ U │ I │ O │ P │ [ │ ] │
├───┼───┼───┼───┼───┼───┼───┼───┼───┼───┼───┼───┤
│ A │ S │ D │ F │ G │ H │ J │ K │ L │ ; │ ' │ \ │
├───┼───┼───┼───┼───┼───┼───┼───┼───┼───┼───┼───┤
│ Z │ X │ C │ V │ B │ N │ M │ , │ . │ / │ ↑ │   │
├───┼───┼───┼───┼───┴───┴───┼───┼───┼───┼───┼───┤
│Fn │Ctl│Alt│Cmd│    Spc    │Cmd│Alt│ ← │ ↓ │ → │
└───┴───┴───┴───┴───────────┴───┴───┴───┴───┴───┘
This is a nice improvement, but any reputable ergonomics guide 2 will insist that you keep your posture neutral, with relaxed shoulders and 90º angles between all joints – this poses a serious problem, as most adults have shoulders much broader than the width of a keyboard, causing an interior rotation of the forearms and an exterior rotation of the palms, which can cause long term strain.
Split ortholinear keyboards
Split ortholinear keyboards to the rescue! By splitting the two halves of the keyboard, these can be placed shoulder-width apart and provide much better ergonomics. Moreover the two sides can be tilted along the longitudinal axis to achieve a more neutral hand position, similar to the one employed in a handshake.
┌───┬───┬───┬───┬───┬───┐   ┌───┬───┬───┬───┬───┬───┐
│Esc│ 1 │ 2 │ 3 │ 4 │ 5 │   │ 6 │ 7 │ 8 │ 9 │ 0 │ - │
├───┼───┼───┼───┼───┼───┤   ├───┼───┼───┼───┼───┼───┤
│Tab│ Q │ W │ E │ R │ T │   │ Y │ U │ I │ O │ P │ [ │
├───┼───┼───┼───┼───┼───┤   ├───┼───┼───┼───┼───┼───┤
│Ctl│ A │ S │ D │ F │ G │   │ H │ J │ K │ L │ ; │ ' │
├───┼───┼───┼───┼───┼───┤   ├───┼───┼───┼───┼───┼───┤
│Sft│ Z │ X │ C │ V │ B │   │ N │ M │ , │ . │ / │Sft│
└───┴───┴───┴───┴───┴───┘   └───┴───┴───┴───┴───┴───┘
            ┌───┬───┬───┐   ┌───┬───┬───┐
            │Bsp│Spc│Low│   │Rai│Ent│Nav│
            └───┴───┴───┘   └───┴───┴───┘
But why stop there? If you take a good look at your hand, you will notice that each finger has a different length and reach. Therefore, most high-end split keyboard feature vertically staggered columns of keys, where the third column (corresponding to the middle finger) is pushed further up the keyboard, whereas the fourth and fifth columns (ring and pinky) are pushed increasingly downward.
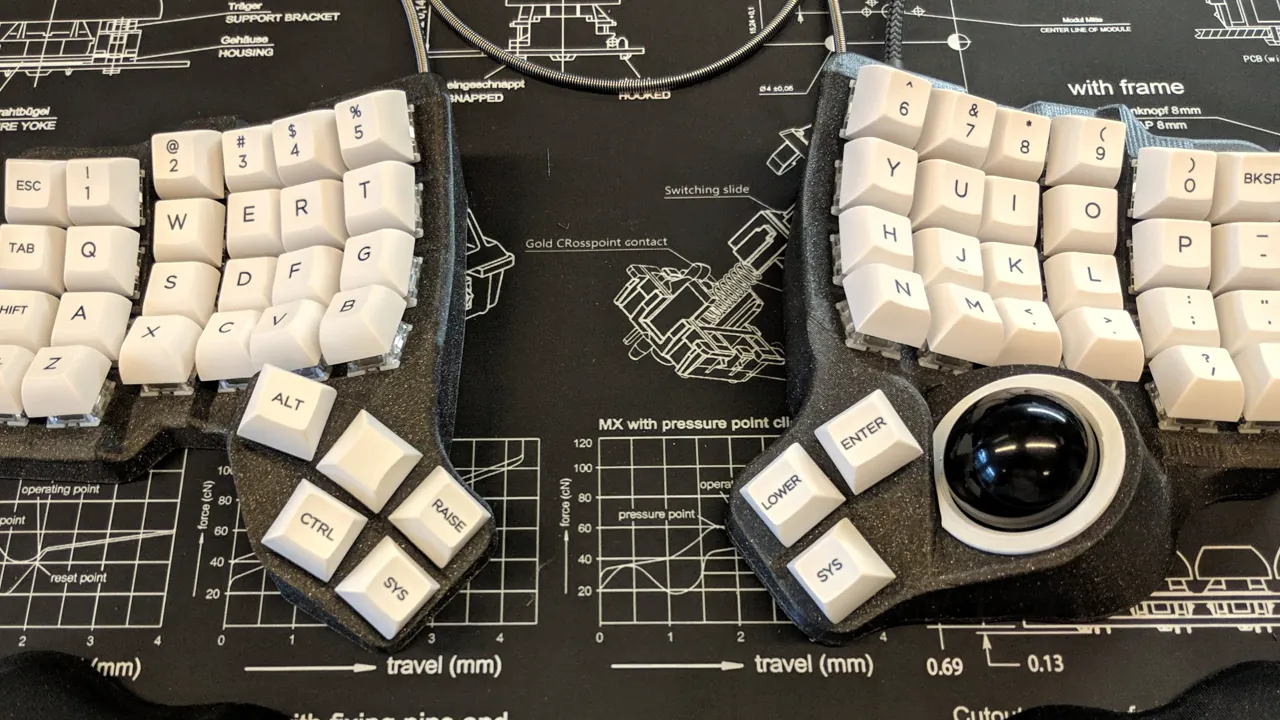
The top of the line models even feature a concave keywell to take the 3-dimentional nature of typing into account, with deeper recessed (and still staggered) keys for longer fingers. Two examples of these are the Kinesis Advantage, a market staple, and the Charybdis, my daily driver, which even features a trackball to help never lift your hands off your keyboard.
At this point, we're leaving the realm of off-the-shelf retail products, as most split keyboards feature custom built PCBs, dedicated microcontrollers, and mechanical hot-swappable key switches. This opens up a new world, and enables another important "feature" which, being obsessed with efficiency and minimalism, I now can't leave without. I'm talking about keyboards that feature fewer keys.
This is where I start to lose the attention of most friends that I show my precious keyboards to. They can easily understand the sub-optimality of the QWERTY layout, of the staggered keys, and even grasp the benefits of a split, concave keywell, but why on earth would you want fewer keys?! The answer goes back to two of my key personal tenets, which I already mentioned in this text: minimalism and efficiency. You can easily achieve a layout that keeps all the most used glyphs, at most one extra key-stroke away.
The quest for the perfect keyboard mapping
Now we start to dig deeper into the rabbit hole, with custom keyboard mappings, and I feel like at this point I should start to state a few principles to guide my design:
- First and foremost, I don’t want to un-learn typing on a normal keyboard. I can fully expect to have to use a normal keyboard occasionally, and while tools like Kanata are awesome (more on that further down in the post), I should still be able to type on somebody else’s computer - not to mention touch-based keyboards on tablets and smartphones. I’m willing to sacrifice some efficiency to the altar of muscle memory.
- I do have an interest in breaking free from the shackles of QWERTY, even if I’m not ready to fully let go (see first point). Therefore, I want to be able to switch between this layout and the vastly superior Colemak-DH depending on the situation.
- Homerow mods are a godsend. It might take a while to get used to them, but they improve the workflow significantly and I honestly can’t think of going back.
- Thumb keys are great, but shouldn’t be overdone - more than three keys for each thumb is way too many, two are probably enough.
- Any operation that requires two or more key-presses should employ both hands. In other words, any modifier (including access to other layers) should be mirrored on both hands.
Once I’ve laid out the ground rules, I can proceed to show and comment my current custom keymap, and some of the options that I employ (mostly related to making Homerow mods work for me). Here, you can find my 3x5 Charybdis keymap for reference.
Base (QWERTY)
┌───┬───┬───┬───┬───┐   ┌───┬───┬───┬───┬───┐
│ Q │ W │ E │ R │ T │   │ Y │ U │ I │ O │ P │
├───┼───┼───┼───┼───┤   ├───┼───┼───┼───┼───┤
│ A │ S │ D │ F │ G │   │ H │ J │ K │ L │ ‘ │
│Ctl│Alt│Gui│Sft│   │   │   │Sft│Gui│Alt│Ctl│
├───┼───┼───┼───┼───┤   ├───┼───┼───┼───┼───┤
│ Z │ X │ C │ V │ B │   │ N │ M │ , │ . │ / │
│Nav│   │   │   │   │   │   │   │   │   │Nav│
└───┴───┴───┴───┴───┘   └───┴───┴───┴───┴───┘
        ┌───┬───┬───┐   ┌───┬───┐
        │Bsp│Spc│Tab│   │Esc│Ent│
        │   │   │Low│   │Low│Hyp│
        └───┴───┴───┘   └───┴───┘

Combos:
	- Q + W => Esc
	- A + S => Tab
	- Z + X => `
	- O + P => [
	- L + ’ => ;
	- . + / => -
Starting with the base layer for QWERTY (there is also a base Colemak-DH layer, where only the character keys are changing), there are a few features of notice. First of all, the aforementioned Homerow mods, in the Mac OS preferred variants. The effectiveness of homerow mods is heavily reliant on the choice of good parameters and settings - mine are as follows:
- Flavour:
- ZMK – Balanced with hold-trigger-key-positions
- QMK – Permissive hold + Chordal hold – this will resolve same-hand chords preferentially as taps, while still resolving other-hand (nested) chords before the tapping time as hold.
- Good timeout values should be based on your typing speed. Mine is about 100 words per minute on a good day, and I use the following:
- Tapping Term – I use a “fast” tapping term of 180 ms for my index fingers (on Shift duty), and a slower 220 ms for the other keys.
- Quick Tap – 120 ms is quick enough to prevent any misfire on key repetitions.
- Require Prior Idle – 100 ms, and 0 ms for Shift, so that key presses entered while typing fast are preferentially resolved as taps, except for Shift keys.
Moreover, another important feature is the use of Combos. Since this 3x5 keyboard lacks two full columns of keys to the left of Q and to the right of P, the keys that conventionally occupy those spaces are instead reached by means of Combos. For example, in order to type the grave accent (`) which I would normally have to the left of Z in an ISO keyboard, I will instead hit Z+X. This also requires some nuance relative to timeouts – in particular for the combos that happen in the home row, where it’s useful to define a Require Prior Idle parameter (I use 120 ms) and a stricter Timeout (30 ms instead of the default 50).
If you paid close attention to the keys, you will have noticed that the expected position of the keys Quote (‘) and Semicolon (;) are swapped. I decided to do this because, while semicolon has its uses, especially in coding, so does the quote, which is also much more prevalent in normal typing.
Lower
┌───┬───┬───┬───┬───┐   ┌───┬───┬───┬───┬───┐
│ ! │ @ │ # │ $ │ % │   │ ^ │ & │ * │ ( │ ) │
├───┼───┼───┼───┼───┤   ├───┼───┼───┼───┼───┤
│ 1 │ 2 │ 3 │ 4 │ 5 │   │ 6 │ 7 │ 8 │ 9 │ 0 │
│Ctl│Alt│Gui│Sft│   │   │   │Sft│Gui│Alt│Ctl│
├───┼───┼───┼───┼───┤   ├───┼───┼───┼───┼───┤
│ [ │ { │ } │ ] │ ’ │   │ - │ = │ , │ . │ / │
└───┴───┴───┴───┴───┘   └───┴───┴───┴───┴───┘
        ┌───┬───┬───┐   ┌───┬───┐
        │Bsp│Spc│Tab│   │Esc│Ent│
        │   │   │Set│   │Set│Hyp│
        └───┴───┴───┘   └───┴───┘

Combos:
	- Q + W => Esc
	- A + S => Tab
	- Z + X => Caps Word
	- O + P => [
	- . + / => \
Next, let’s look at the lower layer. This is for the most part what you would get if you transposed the number row of your keyboard to the home row and separated out the shifted version of those characters. The combo characters are also following the same logic as their counterparts on the Base layer. Still, there are two noteworthy features of this design:
- The same keys that are used to access the Lower layer are used here to access a “Settings” layer. Since these are set up as momentary layers, they are active so long as the key is held, which means that holding one of them takes you to the Lower layer, and holding both takes you to the deeper Settings layer. This achieves one of the principles stated above, letting me use any hand to access the lower layer without crazy hand gymnastics.
- The combo Z+X enables Caps Word – this is a nice feature of custom keyboard firmware that enables Caps Lock, but only for the duration of a word (what constitutes a “word” can be further customized in firmware if the deafaults don’t work for you).
I won’t show the Settings layer as they are pretty straightforward, as it follows the same principle as the Lower layer by bringing the function key functionality to the home row, separating out the FN buttons from the respective OS functionality (brightness, volume, media controls, etc…). The only noteworthy addition are two dedicated keys that toggle the base layer layout between QWERTY and Colemak-DH.jk
Nav
┌───┬───┬───┬───┬───┐   ┌───┬───┬───┬───┬───┐
│   │   │   │   │   │   │Hom│PgU│PgD│End│   │
├───┼───┼───┼───┼───┤   ├───┼───┼───┼───┼───┤
│Ctl│Alt│Gui│Sft│   │   │<— │ ^ │ v │ ->│   │
├───┼───┼───┼───┼───┤   ├───┼───┼───┼───┼───┤
│   │   │   │   │   │   │   │   │   │   │   │
└───┴───┴───┴───┴───┘   └───┴───┴───┴───┴───┘
        ┌───┬───┬───┐   ┌───┬───┐
        │RMs│LMs│MMs│   │RMs│LMs│
        └───┴───┴───┘   └───┴───┘
Finally, let’s explore the Nav layer. Here we have very few keys that are useful for navigation, plus some keyboard-specific settings that I will not include here, such as DPI+ and DPI- (mouse sensitivity) for keyboards with a trackpad or trackball. On the left hand, we keep the modifier keys, useful for making selections with Shift, moving by an entire word with Alt and moving to the end with Gui. On the right hand, we keep the movements, and in the thumb clusters we include the mouse keys, left, right and middle.
I hope this article can be useful in inspiring somebody else in venturing down the rabbit hole of custom keyboards, ergonomics and alternative layouts, or help somebody fine tuning their configuration, or even provide inspiration for their custom layout!
Happy typing :)
Header image: BastardKB Charybdis project, licensed under CC BY-NC-SA 4.0.